If you’re still doing your accounting manually, depositing checks and cash that come in from customers takes a lot of work. You probably wait until you have several payments to deposit to minimize your trips to the bank. When you’re ready, you have to fill out a deposit slip and calculate a total, though you’ve probably already recorded the transactions elsewhere in your bookkeeping system. You must store the transaction receipt from the bank in a safe place, probably in a folder with your documentation from the deposit.
QuickBooks simplifies the process of recording deposits. If you’re using QuickBooks Payments, deposits get processed automatically. If you’re not, you can use QuickBooks tools that help you prepare deposits by selecting payments you’ve already recorded and getting them ready to present to the bank. This is another example of how the software helps you avoid doing unnecessary, tedious bookkeeping chores.
Here’s how it works:
How Do You Record a Payment In QuickBooks?
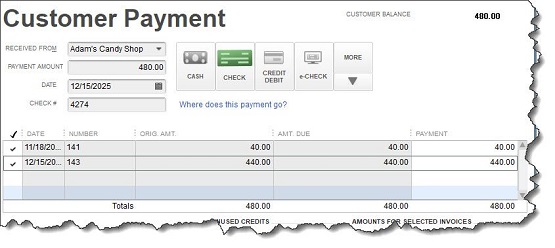
When you receive cash or a check from a customer, QuickBooks allows you to record it in the Receive Payments window. You can select the customer and enter the amount in the fields provided. You can also select the type of payment (cash, check, credit/debit card, or e-check). If the customer has outstanding invoices, you’ll see them listed at the bottom of the window. Double-check your work and save the transaction

Figure 1: You can record customer payments in this QuickBooks window.
Where Do the Payments Go?
Unless you have instructed QuickBooks to do otherwise, payments you record in the software automatically go in an account called Undeposited Funds, where they remain until you deposit them.
To see your Undeposited Funds account, click the Chart of Accounts icon on the home page or open the Company menu and select Chart of Accounts. Scroll down a bit until you see Undeposited Funds. Double click it to see all of the transactions contained there, but don’t alter them. This account is just a holding place for transactions in transition.
How Do You Process a Deposit?
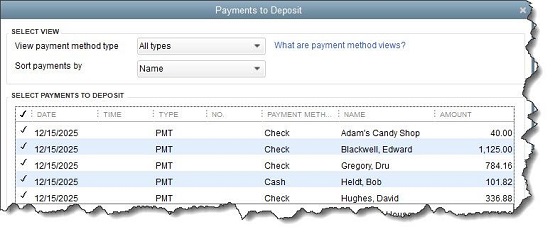
When you’re ready to take cash and checks to the bank and you have your deposit slip ready, click Record Deposits on the home page. A window like this will open:

Figure 2: You’ll select the payments you want to deposit in this window.
Make any changes you want to the options under Select View at the top of the window, and click in front of any payments you want to include in the deposit to create checkmarks. Compare the Payment Subtotal to your deposit slip to make sure they match. When you’re satisfied, click OK.
In the upper left corner of the Make Deposits window that opens, make sure the Deposit To window is showing the account where the funds should go and that the Date of deposit is correct. Add a Memo if you’d like. If you want to receive cash back, select the destination account and enter the amount in the lower left corner of the window. When everything is correct, save the deposit. Your account register will now reflect this transaction.
Help Is Just a Phone Call Away
Deposits are another QuickBooks feature that looks deceptively simple. That is, the mechanics aren’t complicated, but you definitely don’t want to be making any mistakes here. If you need assistance, please call. It’s a lot easier to learn how to use this tool up front than to go in and try to untangle errors.

